Create and install a display LUT with DisplayCAL on Windows
This guide walks through a complete display calibration: DisplayCAL measures test patches shown by VoidVideo, creates a display LUT, installs it directly in VoidVideo, and verifies the result with the meter.
The screenshots use a BT.2020 display mode, gamma 2.2, and 833 auto-optimized measurement patches. Choose targets that match your own display and viewing environment rather than copying those values blindly.
Before you start
Which DisplayCAL release to use
We do not yet have a verified, unmodified DisplayCAL release to recommend for this complete workflow. The latest release is 3.9.19, but its madTPG bugs prevent recommending it simply because it is current.
| Release | Known limitation for this workflow |
|---|---|
| 3.9.18 / 3.9.19 | Stale MadTPG_Net references can stop calibration. The network client also has gamma-ramp serialization, fragmented-message reception, and boolean-reply decoding defects. The .19 failure is tracked in upstream issue #980. |
| 3.9.17 | Our network checks completed discovery, session start/stop, and LUT upload, but negative replies are decoded incorrectly. It also has the JSON compatibility bug #637. These checks do not qualify a complete calibration run. |
| 3.9.16 and earlier | No complete VoidVideo calibration validation. .16 has a reported madTPG verification failure, and its JSON compatibility code has the same defect as .17. Downgrading is not a verified workaround. |
A locally repaired 3.9.19 is our validation candidate. It has passed network compatibility checks, including 1,000 scripted patch callbacks, but has not yet been qualified through a complete Windows meter run: calibration, profile saving, LUT creation and installation, and verification. There is no published VoidVideo-qualified installer to link here yet.
Upstream development already contains the gamma-ramp and boolean-reply fixes. As checked on October 12, 2026, the stale class references and fragmented receive-buffer bug remain. A nightly build therefore is not a verified substitute either.
Where the Windows downloads come from
The maintained community project is eoyilmaz/displaycal-py3. Its release Assets include Windows-x64.exe installers for Intel/AMD PCs and Windows-arm64.exe installers for Windows on ARM. These are upstream downloads, subject to the compatibility limitations above.
The Windows download on displaycal.net is still the original 3.8.9.3 release from December 2019, not the maintained Python 3 fork. That original release has not been qualified for this guide.
Debian packages the Python 3 fork: Debian 12 (Bookworm) provides 3.9.10-2, and Debian 13 (Trixie) provides 3.9.16-1. Package availability does not establish compatibility with this workflow.
Other requirements
You need:
- A Windows 10 or Windows 11 computer. Check the DisplayCAL release limitations above before starting.
- ArgyllCMS. DisplayCAL offers to download it the first time it starts.
- A supported colorimeter or spectrometer.
- The Windows computer and VoidVideo on the same private network.
- Access to the display's picture controls.
Allow DisplayCAL through Windows Defender Firewall when Windows asks. Select Private networks so DisplayCAL can find VoidVideo.
Close madVR and madTPG on every computer connected to the same network. A running copy can answer DisplayCAL's discovery request or occupy the madTPG ports, causing DisplayCAL to connect to the wrong pattern generator or preventing VoidVideo from starting its service.
1. Make DisplayCAL connect to VoidVideo
DisplayCAL must use its network madVR connection to reach VoidVideo.
Start DisplayCAL once, then close it. This creates its settings file.
Press Windows key + R.
Enter
%APPDATA%\DisplayCALand press Enter.Open
DisplayCAL.iniin Notepad.Find the existing
[Default]heading.Make sure the file contains this section:
ini[Default] madtpg.native = 0This is also the complete minimum
DisplayCAL.inifile. If your file already contains a[Default]section with other settings, keep those settings and addmadtpg.native = 0below the existing heading. Do not add a second[Default]heading.Save the file and close Notepad.
In VoidVideo, open Display and turn on Remote Calibration Discovery. If your network has more than one VoidVideo system, enable discovery only on the system you want to measure.
Start DisplayCAL again.
2. Prepare the projector or display
The profile and LUT are valid only for the exact display settings that were measured:
- Select the projector or display picture mode you want to calibrate.
- Select the physical gamut or color-space setting for that mode. It does not have to carry the same name as the LUT's source colorspace. For example, DisplayCAL can create a BT.2020-input LUT for a projector measured in its native-gamut mode.
- Set the lamp or laser power, brightness, contrast, color temperature, gamma, iris, and any other controls you intend to use during playback.
- Turn off dynamic contrast, adaptive brightness, dynamic color, automatic tone adjustment, ambient-light adjustment, and other controls that change the picture while it is being measured.
- Warm up the projector or display before placing the meter and starting the run.
Do not change any of these settings during profiling or verification. A different picture mode, gamut mode, light level, or gamma setting requires a different device profile and LUT.
VoidVideo requires no calibration setup beyond enabling Remote Calibration Discovery. DisplayCAL starts and stops the pattern session; VoidVideo handles the pattern path, capture pause, LUT bypass, menus, overlays, and normal video processing automatically.
JVC D-ILA example
JVC menu names and available choices vary by model. Native/no-filter and filtered modes are both valid calibration targets; the choice is a brightness-versus-gamut preference. For the BT.2020/Gamma 2.2 workflow shown in this guide, a typical JVC D-ILA setup is:
- Choose a User or other dedicated Picture Mode that you can leave unchanged.
- Choose the physical gamut under Color Profile:
- For the projector's native gamut without the wide cinema filter, choose Off (Normal) or Off, depending on the model. This disables JVC's color-space adjustment and retains the brighter normal-filter path.
- Choose BT.2020 (Normal) if you want JVC's BT.2020 color profile on the brighter normal-filter path.
- Choose BT.2020 (Wide) if you want the wider gamut provided by the cinema filter and accept its lower light output.
- Set Color Temp. to 6500 K.
- Set Gamma/Tone Mapping to a fixed Gamma 2.2 mode for this example. Do not use Frame Adapt HDR, Theater Optimizer, or another changing tone-mapping mode while measuring this profile.
- Set LD Power or lamp power to the level you will use for playback.
- Set Dynamic CTRL to Off and keep the aperture at a fixed value.
- Record these settings with the profile name so you can restore the exact same projector state later.
JVC documents Picture Mode, Color Profile, Color Temp., Gamma/Tone Mapping, LD Power, and Dynamic CTRL under its D-ILA picture settings. On models with separate wide and normal BT.2020 profiles, JVC lists those choices in the model's Color Profile menu.
JVC's own calibration system is separate from this procedure. It writes three internal 1D LUTs; VoidVideo and DisplayCAL do not read, replace, or modify them. You do not need to run JVC calibration before creating a VoidVideo display LUT. JVC provides its Projector Calibration Software guide and model-specific downloads for users who choose to calibrate the projector internally as a separate task.
The BT.2020 selection later in DisplayCAL describes the input accepted by the finished LUT. It does not require the JVC to use its internal BT.2020 color profile. DisplayCAL measures the native projector gamut and builds the mapping into the LUT.
Create a separate device profile and LUT for every JVC mode you actually use—for example, one for native Off (Normal) and another for BT.2020 (Wide). A LUT measured with the color filter engaged does not describe the projector with the filter disengaged.
3. Select the display, meter, and correction
Open Display & instrument in DisplayCAL.
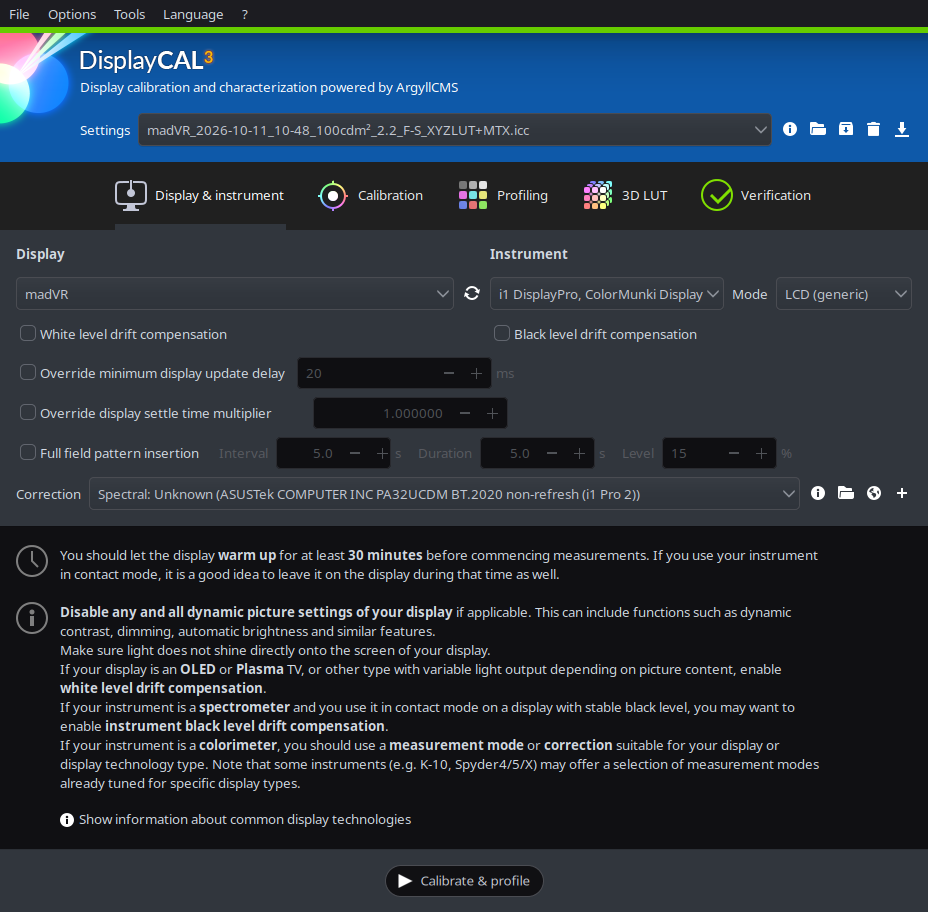
Set the following:
- Under Display, select madVR.
- Under Instrument, select your meter.
- Choose the measurement mode recommended for your display technology.
- If you are using a colorimeter, click the small globe button to the right of Correction. This opens DisplayCAL's online Colorimeter Corrections Database.
- Search for the projector or display manufacturer and model, then restrict the results to your exact meter. For a projector, prefer a correction measured from the same model, light-source type, and gamut/filter mode.
- Download the best matching correction and select it in the Correction list.
The Colorimeter Corrections Database corrects how a colorimeter reads a particular display spectrum. It does not provide projector brightness, gamma, iris, CMS, or other picture-control adjustments. Those settings define the mode you are profiling and must be chosen on the projector first.
Database corrections are contributed by users and are not guaranteed to improve accuracy. A correction measured from your own projector with a reference spectrometer is preferable. If you are measuring directly with a spectrometer, do not select a colorimeter correction. A colorimeter can repeat the same reading very consistently and still be inaccurate when the wrong correction is selected.
4. Choose the calibration targets
Open Calibration and choose the white point, white level, tone curve, and black-output settings for the display mode you are calibrating.
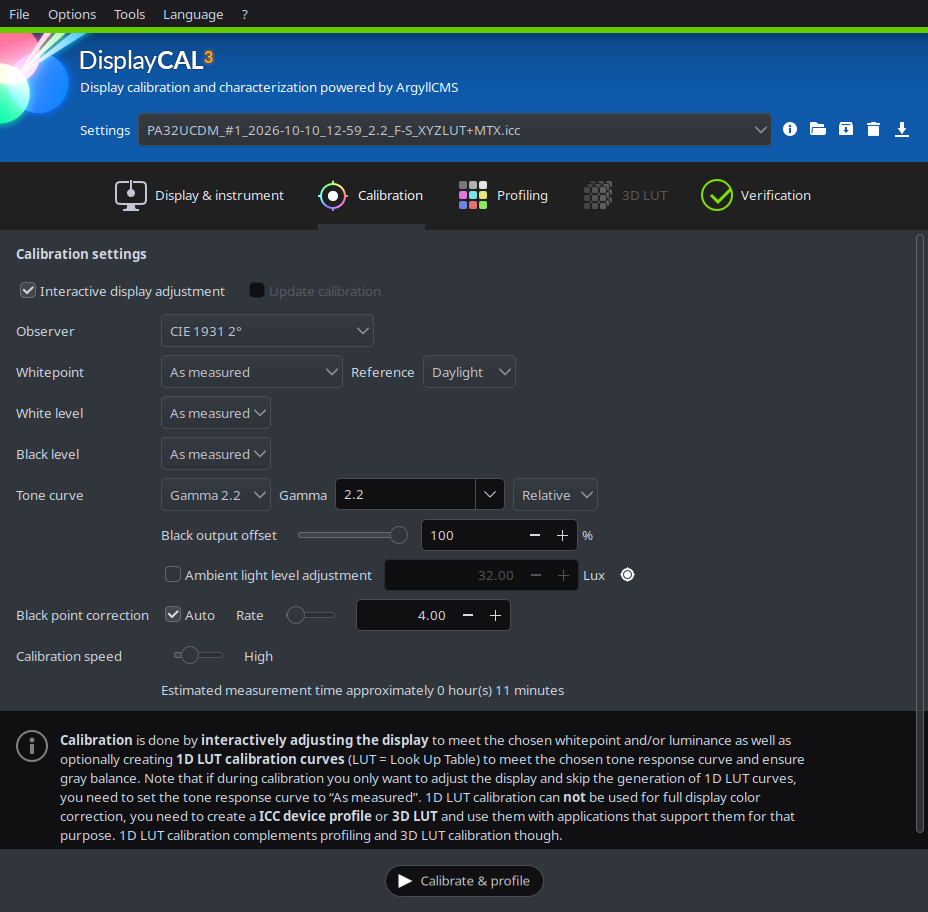
For a standard video calibration, set Whitepoint to 6500 K (D65). The screenshot shows As measured, which is useful only when you deliberately want to keep the display's native white point. Before profiling starts, confirm that the meter correction selected in the previous section is still active. During DisplayCAL's interactive adjustment, adjust the projector or display's color temperature or RGB gain controls until the measured white reaches D65, then adjust brightness to the chosen white level.
The white-point target and 3D LUT rendering intent must describe the same goal:
- If you target 6500 K (D65) here, use Absolute colorimetric with white point scaling when configuring the 3D LUT.
- If you deliberately leave Whitepoint at As measured to retain the display's native white, use Relative colorimetric when configuring the 3D LUT.
Do not combine As measured with Absolute colorimetric with white point scaling unless you specifically intend to remap the native white. That mismatch can make the LUT remove too much of one channel and give neutral white a visible tint. An incorrect colorimeter correction can cause the same problem because DisplayCAL will build the LUT around a biased white measurement.
5. Choose the profile and number of patches
Open Profiling.
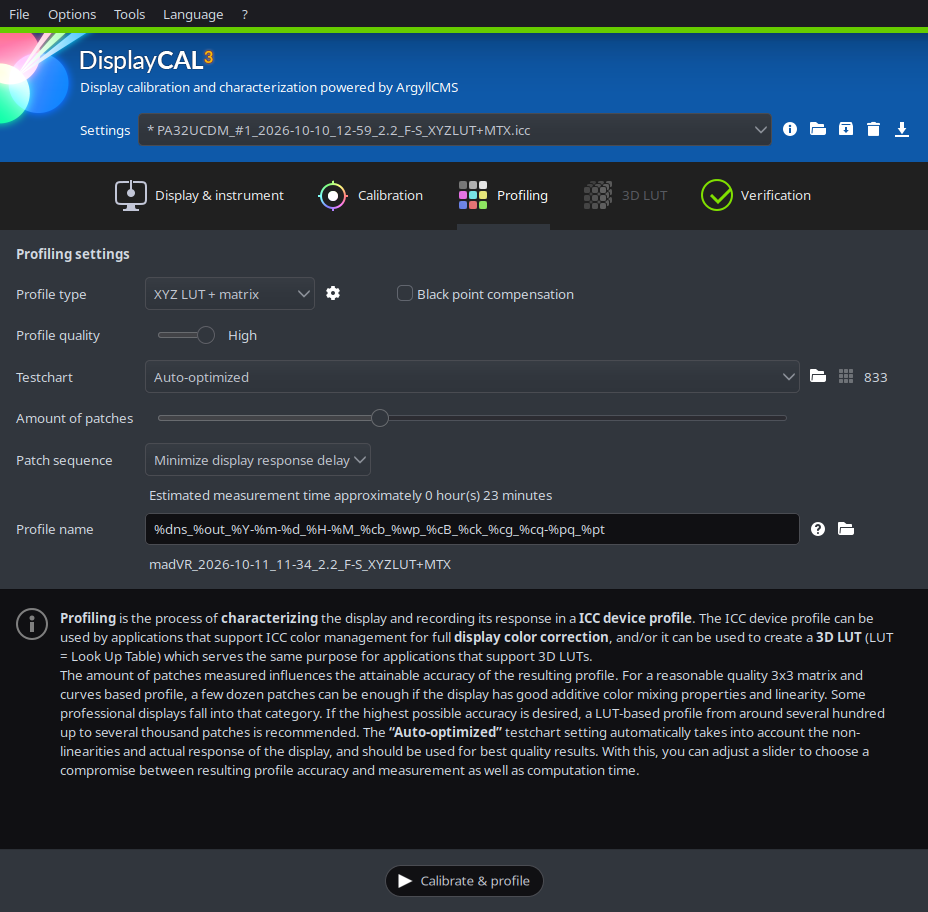
For the example workflow:
- Set Profile type to XYZ LUT + matrix.
- Set Profile quality to High.
- Select Auto-optimized as the testchart.
- Use the Amount of patches slider. The patch count appears beside the Testchart field. DisplayCAL provides specific optimized totals rather than every possible number.
- Choose the patch count:
- 425 patches is the minimum we recommend for a final LUT profile. It is useful when measurement time is limited.
- 833 patches is our recommended setting. It gives DisplayCAL a denser sample of the display while keeping the run practical.
More patches take longer but give DisplayCAL more measurements of the display's behavior. More patches cannot correct a wrong meter correction, a changing display preset, or a signal-range mismatch.
What the device profile is
The measurement run creates an ICC device profile that describes how the selected projector or display mode actually responds. DisplayCAL uses that measured profile to calculate the 3D LUT. The device profile is not the 3D LUT, and VoidVideo does not use the ICC file during playback.
Keep the device profile with the generated LUT and measurement files. Give it a name that identifies the projector or display, picture mode, physical gamut setting, target white level and gamma, and date. Do not use a profile measured from a different picture mode or brightness setting to generate a new LUT.
6. Configure the 3D LUT
Open Options, enable Enable 3D LUT tab, then open 3D LUT and enable Create 3D LUT after profiling.
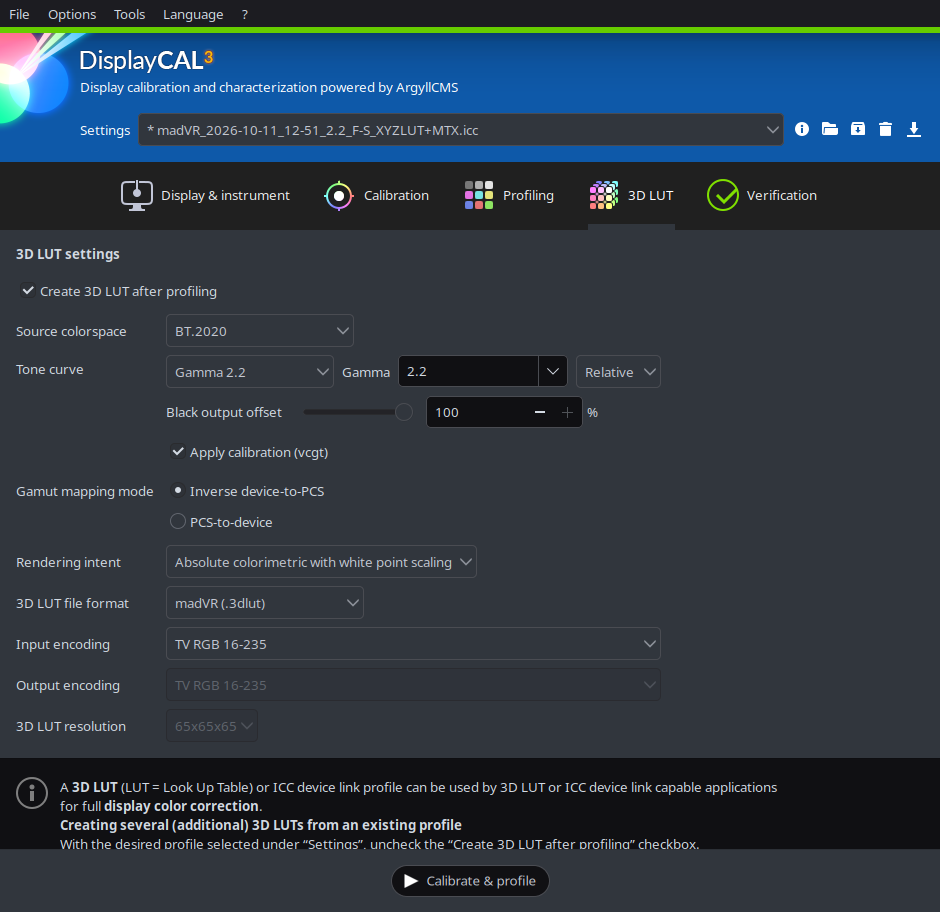
For direct installation into VoidVideo, use these settings:
- Set 3D LUT file format to madVR (.3dlut).
- Set Source colorspace to the signal space the finished LUT will accept. Choose BT.2020 for the example in this guide.
- Set the tone curve to the signal transfer the finished LUT will accept and the target used on the Calibration page. Choose Gamma 2.2 for this example.
- Leave Apply calibration enabled so the saved LUT includes DisplayCAL's grayscale and gamma correction.
Choose the rendering intent
The rendering intent controls what the LUT does when the source white point or source colors fall outside the display's measured range.
| Rendering intent | What it does | When to use it |
|---|---|---|
| Absolute colorimetric with white point scaling | Keeps measurable colors accurate and scales the source white point when necessary to avoid clipping. | Recommended for normal video calibration when the display was calibrated to the source white point, usually D65. |
| Relative colorimetric | Maps the source white point to the calibrated display white and clips colors the display cannot reproduce. | Use when you deliberately calibrated to a different or native white point and want the LUT to keep that white point. |
| Absolute colorimetric | Preserves the source white point without the protective white-point scaling. | A specialized comparison mode. It can clip near white and is usually a poorer choice than the scaled version. |
| Perceptual and the perceptual appearance options | Compress or expand the source gamut so more color relationships remain visible, but measurable in-gamut colors can change. | Use only when preserving overall appearance matters more than reference accuracy. |
| Saturation and Preserve saturation | Favor vivid color over color accuracy. | Intended for graphics and presentation material, not reference video calibration. |
| Absolute appearance and Luminance matched appearance | Include viewing-condition and appearance modeling. | Advanced workflows with a specific reason to simulate different viewing conditions. |
For the BT.2020/D65 example in this guide, select Absolute colorimetric with white point scaling. If you leave Whitepoint set to As measured because you want to retain the display's native white, select Relative colorimetric instead.
DisplayCAL locks the madVR input and output encoding controls to TV RGB 16-235. That is expected for this format; VoidVideo reads the range from the installed LUT.
The madVR .3dlut format is the recommended choice because DisplayCAL can install it directly and it carries the information VoidVideo needs to apply it correctly.
DisplayCAL can also save these formats for other workflows:
| Format | When to use it |
|---|---|
| madVR (.3dlut) | Recommended for VoidVideo and required for direct installation from DisplayCAL. |
| IRIDAS (.cube) | Use when another program or device requires a .cube file. It must be imported separately. |
| Device link profile (.icc/.icm) | Use when an ICC device-link workflow specifically requires it. |
7. Measure the display
Position the meter
For a projector, measure the light reflected by the screen:
- Put the meter on a stable table or tripod in front of the screen.
- Point the meter's measurement optics at the center of the projected patch. Do not point the meter at the projector lens.
- Keep the meter out of the projector beam so it does not cast a shadow on the measured area. Make sure the entire meter field of view remains inside the patch.
- Darken the room and keep people, menus, and other light sources away from the measured area.
For an i1Display Pro, i1Display Pro Plus, or equivalent Calibrite ColorChecker Display meter, lift the diffuser arm and rotate it halfway toward the back. The uncovered optics face the screen, while the arm acts as a stand. You can also use the threaded tripod mount. Do not put the diffuser over the sensor for this measurement. Calibrite illustrates this position under Projector Measurement in its Display device quick-start guide.
The diffuser covers the optics only for an ambient or direct-light measurement. ArgyllCMS can use that mode with a meter facing the projector when reflected light is too low, but its documentation warns that the result does not include the screen's effect on color. Do not use it for the normal screen-based profiling procedure in this guide. See ArgyllCMS's explanation of projector and ambient measurement modes.
For a flat-panel display, rotate the diffuser away from the optics and place the meter flat against the measurement area on the screen.
Start the measurement
- Return to Display & instrument.
- Click Calibrate & profile.
- Complete the interactive display adjustment if DisplayCAL shows it.
- Start the measurement run.
VoidVideo pauses normal capture and suppresses its menus and overlays while measurement patches are being shown. Keep the meter in place. An 833-patch run can take a while.
When the measurements finish, give the profile a useful name that includes the display preset, gamut, tone curve, brightness, and date.
8. Install the LUT directly in VoidVideo
After DisplayCAL creates the madVR LUT, click Install 3D LUT.
Wait for DisplayCAL to report 3D LUT installation successful. VoidVideo stores the LUT, selects it, and enables it automatically.
Play familiar content briefly and confirm that the image is visible and the display remains in the same picture preset used during profiling. Do not judge calibration accuracy by eye; use the verification run in the next step.
9. Verify the installed LUT
Open Verification in DisplayCAL.
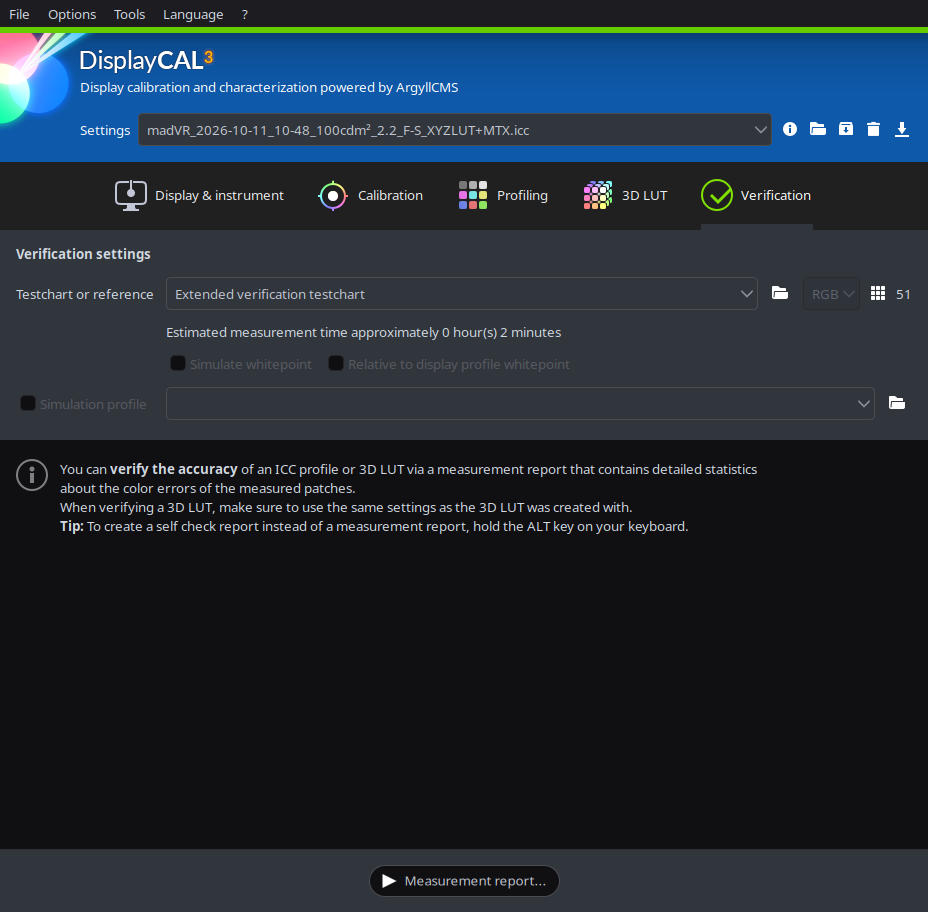
- Select an extended verification testchart.
- Confirm that the installed display LUT will be used for the report.
- Click Measurement report.
- Keep the same meter correction, display preset, brightness, and signal range used during profiling.
- Save the report with the DisplayCAL profile and LUT.
The report is the proof that the saved LUT is correcting the display. If the verification is poor, first check the meter correction, display preset, brightness, source colorspace, tone curve, and output range before creating another LUT.
If DisplayCAL cannot find VoidVideo
Check these items in order:
- Confirm
madtpg.native = 0is below the existing[Default]heading inDisplayCAL.ini. - Close and restart DisplayCAL after changing the file.
- Confirm Remote Calibration Discovery is enabled in VoidVideo.
- Confirm Windows classifies the connection as a private network and allows DisplayCAL through the firewall.
- Turn Remote Calibration Discovery off and back on, then restart DisplayCAL.